X-ray analysis experiments
X-ray analysis experiments
Bone is a tissue that cannot be seen from the outside of the body, but since the discovery of X-rays by Whilhelm Röntgen, X-rays have become a powerful technique for visualizing skeletal diseases. x-rays have wavelengths in the range of 10 nm to 100 pm, and can penetrate soft tissues but are greatly attenuated when encountered in bone, making X-rays an effective means of obtaining information about developmental disorders and metabolic bone diseases. Therefore, X-ray is an effective technique for obtaining information on developmental disorders and metabolic bone diseases. Within minutes, the entire mouse skeleton can be visualized, down to the individual bones and joints.
Principle
The basic principle of X-ray analysis experiments is that X-rays have wavelengths ranging from 10 nm to 100 pm and can penetrate soft tissues, but are greatly attenuated when they encounter bone.
Operation method
X-ray analysis experiments
Principle
The basic principle of X-ray analysis experiments is that X-rays have wavelengths ranging from 10 nm to 100 pm and can penetrate soft tissues, but are greatly attenuated when they encounter bone.
Materials and Instruments
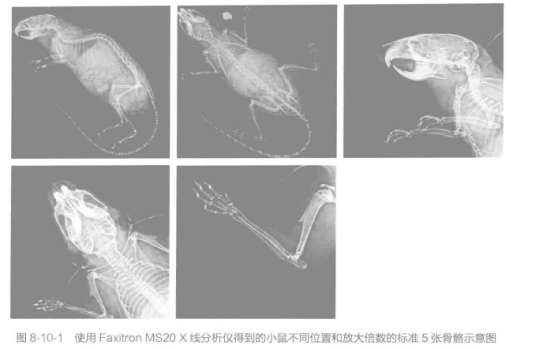
Equipment: FaXitron MS20 Cabinet X-ray Irradiator, Computer Move The basic procedure for an X-ray analysis experiment can be divided into the following steps: . Analyze the images. An example of the results is shown in Figure 8-10-1. For more product details, please visit Aladdin Scientific website.
A. Ensure that the connected computer is turned on.
B. Turn the instrument on by turning the instrument key clockwise (the Ready green light is on for a successful startup).
C. Set the radiation level to 20 kV and the Time/AEC to 300 s, and click on Start to warm up the instrument.
D. After warming up the instrument, double-click on the FaXitron SR icon on the desktop to start the program. FaXitron SR icon on the desktop to start the program. Click Start Procedure and select "test-Phantom", click Next.
E. Transfer the mice to be tested from the animal room to the test area and record the mice.
F. Begin to anesthetize the mice and carefully monitor the animals until you are sure they are unconscious.
G. In the software, click Start Procedure to open a new Measurement window. Fill in the information window:
First Name : Mouse ID
Middle Name : Ear tag (e.g. : 1 L)
Last Name : Genotype
Patient ID : Mouse barcode (e.g. : M00002695)
Birth : Date of birth
gender : Sex
Click Next to select the stratification position for scanning, and continue to click Next. Scanning will begin.
H. Each mouse will be scanned in 5 different directions: full body dorsal view, full body lateral view, head lateral view, head dorsal view, and limbs.
I. Arrange the mice in the following manner
Full Body Dorsal View: (Layer 1) Place the photo board on the bottom layer and make sure the square photo area is centered. Place the mouse in the photo area with its back up, head toward the upper left corner of the photo area, and tail toward the lower right corner of the photo area. The red cross light of the instrument should be shining on the back of the mouse. In addition, make sure that the back and neck are straightened, the paws are turned away from the body and facing down, and the tail is fully positioned in the photo area and on the left side of the body and is not covering any other part of the body (tape can be used to secure it if necessary).
Lateral view of the whole body: (first layer) The mouse is placed in the photo area with the side up, the head facing the upper left corner of the photo area, and the tail facing the lower right corner of the photo area. At this point the red cross light of the instrument should be shining on the mouse's buttocks. In addition, make sure that the shoulders are as close together as possible; the right hind limb is gently pulled to the level and the sole of the foot is perpendicular to the photographic plate; the left hind limb is in a natural position and the sole of the foot is perpendicular to the photographic plate; and the tail is positioned completely in the photographic area and on the back of the body and does not cover the rest of the body (tape can be used to fix it, if necessary).
Lateral view of the head: (second layer) The mouse is placed in the photo area with its side up and its head in the center of the photo area. The red cross light from the instrument should be shining between the eyes and ears (vertical line) and parallel to the nose and mouth (horizontal line).
Head and back view: (second level) The mouse is placed in the photo area with its back up and its head in the center of the photo area. The red cross light from the instrument should be shining on the top of the head, with the ears pointing upwards.
Left Forelimb Abdominal View: (Top Level) Place the mouse in the photo area with the left forelimb in the lower left 1/4 of the photo area and the left forepaw in the upper left 1/4 of the photo area. Make sure the left elbow is extended from the trunk at this point; the red cross light should be below the mouse's ear.
J. Close the instrument door.
K. Set the radiation level to 20 kV and Time/AEC to 10 s.
L. Click the green start button to begin scanning.
M. After the image is taken, remove the mouse. Place the mouse on a heating pad set at 37 °C, keep it in the cage and monitor it closely until it regains full consciousness.
N